As expected, Microsoft has finally released to the general public, Windows 7 Service Pack 1 (SP1). The pack has been available for some time to some corporate and OEMs (computer manufacturers), but it was just released this past Tuesday, February 22nd, to the rest of us.
If you are new to Service Packs, they are basically a group of fixes and (sometimes) enhancements to a software product that have been packaged together in one big update. In the case of Windows 7 SP1, the update is about 45MB in size through the Automatic Update feature, or from 500 to 900MB as a straight download.
Service Packs have been around a long time, and all versions of Windows have had them. For example, during Windows XP lifetime (which is still going on for many people), three service packs were issued. In fact, with XP, Microsoft now only officially supoorts those Windows XP users who HAVE upgraded to SP3.
But to cut to the chase, what does this mean to Windows 7 users, and what should you do? Here are some important facts and tips…
![Win7-Update-SP1-00]() Since service packs always include fixes, and very often security enhancements, you should almost always install them. Yes, they have at times been known to cause issues, but the fact is, your computer still needs them to remain safe.
Since service packs always include fixes, and very often security enhancements, you should almost always install them. Yes, they have at times been known to cause issues, but the fact is, your computer still needs them to remain safe.
- Before you update to SP1, you should backup your important stuff (documents, pictures, etc.). Now, you should be doing this anyway, but it never hurts to get a reminder… does it?
- The easiest way to get SP1 is by just letting Windows Automatic update do it for you. In fact, you may already HAVE Sp1 through automatic update, since it came out way back on Tuesday. To check to see if you have it, go to your Windows desktop, RIGHT click COMPUTER, and choose PROPERTIES. In the window that appears, find the section called Windows Edition, and see if SP1 is already listed there.
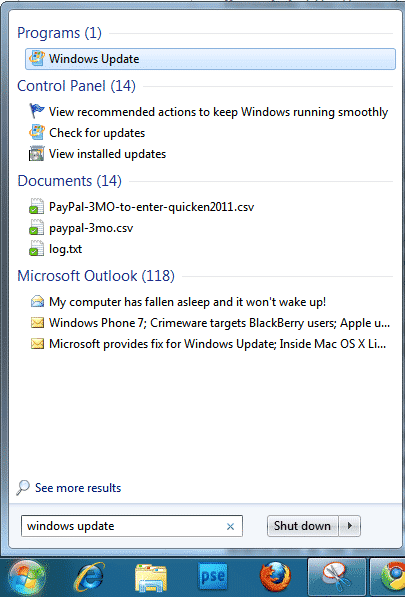
- If you don’t yet have it installed, and you want to go ahead and get it done, just go to the START button, and in the search box at the bottom, start typing in “Windows Update”. You should see that program appear at the top of the menu. Click it, and the Windows Update window appears. You should see that “updates are available for your computer” and that there’s “1 important update”. If you click the 1 important update link, you’ll be taken to the update screen where you can choose to have the update downloaded and installed.
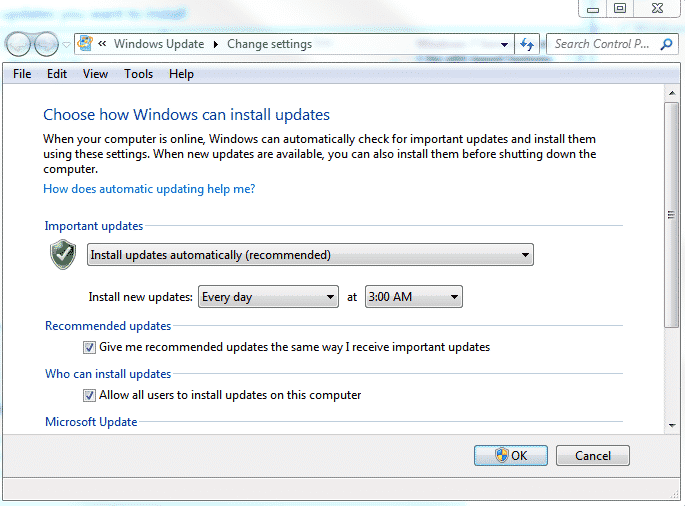
![Win7-Update-SP1-02]() By the way, if you want to check and see if Windows Automatic Updates is turned on, go to the START button, and in the search box type “automatic updates”. The search should return an option that says “Turn automatic updates on or off”. Choose this and you’ll be taken to a window that lets you make changes to automatic update. As we’ve already said, it’s probably best to leave these turned on.
By the way, if you want to check and see if Windows Automatic Updates is turned on, go to the START button, and in the search box type “automatic updates”. The search should return an option that says “Turn automatic updates on or off”. Choose this and you’ll be taken to a window that lets you make changes to automatic update. As we’ve already said, it’s probably best to leave these turned on.
Now to be honest, I have yet to install SP1 on my own computers. But this is only because I just haven’t gotten around to it yet this week. But, as soon as I’m done with this blog article, guess what I’ll be doing? Yup… letting the SP1 upgrade go for it. And if I have any problems, I’ll be sure to let you know.
Also, you can GO HERE to read more about installing Windows 7 SP1, and GO HERE to see a good article from CNet about the upgrade.
As always, if you have any comments or questions, PLEASE them them below in the comments area.


 Since service packs always include fixes, and very often security enhancements, you should almost always install them. Yes, they have at times been known to cause issues, but the fact is, your computer still needs them to remain safe.


Just as an update… A few days ago I updated two of my production machines with SP1. One machine is running the 64bit version of Windows Professional, and the other the 32bit version of Windows Professional. I had no trouble whatsoever doing the update, nor have I had any problems. In fact, the upgrade has fixed a few, small nagging glitches I had with a couple different programs on one of the computers.
I have been converted from XP to windows 7. The old XP had a print photos operation that was perfect to use as an artist. The windows 7 will not let me select pictures and print them on my cannon printer. Is there some way that I can get the printer to operate on windows 7 as I had it on XP? thanks Art.